Launch Your Online Store in 2025: A Beginner’s Guide
Embarking on the journey of entrepreneurship can feel daunting, especially when it comes to launching an online store. Perhaps you're a budding entrepreneur with a brilliant product idea but lack the technical know-how. Or maybe you're a seasoned business owner looking to expand your reach into the digital realm but are overwhelmed by the sheer number of platforms and complex setups.
The truth? Starting an online store in 2025 doesn’t demand technical expertise or years of business experience. At ShareWordpress, we've empowered countless beginners to build thriving e-commerce businesses from the ground up, and we're here to show you how.
WordPress, a platform trusted by millions, combined with powerful e-commerce plugins like WooCommerce, has demystified online selling. We even leverage WordPress and Easy Digital Downloads to effortlessly sell our own digital products. The benefits of this accessible approach are undeniable: flexible hours, minimal startup costs, and complete, unbridled control over your business.
While the path to a successful online store is simpler than ever, foundational guidance is key. From selecting the perfect platform to configuring secure payment gateways, this comprehensive guide will equip you with a step-by-step blueprint to launch your online store with confidence.
Ready to transform your vision into a live, revenue-generating online business? Let’s dive into each critical step.
Prefer to bypass the DIY route entirely? Our experts at ShareWordpress Pro Services are ready to craft a bespoke online store tailored to your exact needs, from initial concept to full optimization.
Unlocking Your E-Commerce Potential: Choosing the Right Platform
The first pivotal decision on your e-commerce journey is selecting the right platform. It’s a common question that can feel overwhelming, but we’ve guided thousands of store owners through this choice, making it straightforward for you.
Essentially, you face two primary routes for building your online store:
WordPress.org with an e-commerce plugin like WooCommerce.
Hosted solutions such as Shopify or BigCommerce.
Consider it like owning versus renting a physical retail space. With WordPress.org and WooCommerce, you gain absolute ownership of your store. You control your hosting, manage all costs Transparently, and customize every element to your heart’s desire.
Conversely, utilizing e-commerce solutions like Shopify is more akin to renting a shop in a mall. While they offer a faster initial setup, you concede significant control, often face mandatory plan upgrades as your business scales, and are confined to the platform's native features.
Our unwavering recommendation is to opt for WordPress.org for e-commerce. Our extensive experience confirms its unparalleled flexibility and scalability, ensuring you're never "locked in" or limited in your creative and growth ambitions, without facing unforeseen cost spikes.
WordPress also empowers you to select the ideal e-commerce plugin for your specific product offerings:
Selling physical goods? WooCommerce is your robust solution.
In this guide, we will focus on building your online store with WordPress.org and WooCommerce, given its widespread adoption and powerful capabilities. Here’s a roadmap of the expert-guided steps we'll cover:
💡 Ultimate Shortcut: Bypass the entire setup complexity. Let ShareWordpress Pro Services build your custom WooCommerce site effortlessly and affordably. We handle design, SEO, and everything in between. Get Our WordPress Website Design Services Today!
Step 1: Define Your Niche – What Will You Sell?
Before anything else, pinpointing what you’ll sell is perhaps the most strategic decision in launching your online store. Your product selection forms the bedrock of your entire business – influencing your brand, website features, marketing strategy, and operational demands.
To discover your ideal product or service, begin by asking yourself these crucial questions:
What truly ignites your passion? Choose a product category you genuinely care about. Running an online store demands dedication, and selling something you love will fuel your motivation and deepen your product knowledge.
Can you identify an unmet need in the market? Sometimes, the most profitable e-commerce ideas emerge from bringing existing products to underserved markets. Look for gaps in your local area or broader online communities.
Is there a problem you can solve? Have you observed a recurring frustration that your product could alleviate? Conduct market research to validate if others share this pain point and would be willing to pay for a solution.
How can you innovate on existing products? If similar offerings exist, define your unique selling proposition. Can you offer superior quality, more competitive pricing, or target a specific audience currently overlooked?
Once you have potential products in mind, you'll need to determine your business model for production, sourcing, and management. Here are your primary options:
Experts and creators who want passive income potential
🏭 Manufacturing
Partner with factories to make your product ideas
• Product designs • Larger starting budget • Patience for development
Businesses ready to create unique products at scale
Furthermore, mastering your e-commerce product pricing is vital, as it directly impacts your profit margins and target audience. Our beginner's guide to e-commerce pricing models breaks down all the proven strategies.
Once your product vision is clear, you’re ready for the next crucial step.
Step 2: Forge Your Identity – Crafting a Captivating Brand
With your product defined, it's time to sculpt a brand that captivates your ideal customer and instills trust. Your brand design will permeate every touchpoint, from your website's aesthetics to your product packaging, making it essential to get right.
Start with your business name. It needs to be memorable, clearly communicate your offering, and be effortlessly spellable, rememberable, and typable. Take ShareWordpress, for example: simple, direct, and immediately conveys our mission to help WordPress novices.
Before you commit, diligently check if your chosen name is available as a domain name. Ideally, your business and domain names should align perfectly for brand consistency and ease of discovery. Also, research relevant trademark databases like WIPO to safeguard against potential legal conflicts.
Next, move to your logo design. Thanks to modern AI-powered logo makers, professional-grade logos are now accessible and affordable. Remember, simplicity often reigns supreme. Think of iconic brands like Nike or Apple – their timeless logos prove that less is often more impactful.
Your color scheme is another foundational element. The colors you select will define your brand’s emotional resonance across your website, social media, and marketing collateral. Different colors evoke distinct emotions and convey specific messages. For instance, blue frequently symbolizes trust and professionalism, which is why financial giants like PayPal utilize it to foster a sense of security.
Finally, carefully consider your typography – the fonts you’ll employ. Effective typography ensures readability while subtly reinforcing your brand's personality. Serif fonts (like Times New Roman) often communicate tradition and reliability, whereas sans-serif fonts (like Arial) project modernity and simplicity.
We advise choosing one font for eye-catching headings and another for body text to prioritize readability. Poppi’s example illustrates balanced typography beautifully:
With your brand identity firmly established, you’re ready to formalize your business and lay the groundwork for your online store.
Step 3: Formalize Your Vision – Essential Business Registration
✋ Important Note: This information is for general guidance only and should not be considered legal advice. We strongly recommend consulting with local authorities, a legal professional, or an accountant to ensure your business fully complies with all relevant regulations in your area.
Before you launch, making your business official is a critical step. Some entrepreneurs prefer to validate their market and product ideas first, registering their business after gaining traction. Others opt for pre-launch registration to claim business expense deductions from day one and proactively avoid potential legal entanglements.
While specific requirements vary by location, here are the fundamental elements you’ll typically need to address:
📝 Business License: This grants you official permission to operate. Most regions demand at least a basic business license; specialized products or services might require additional permits.
💰 Tax Registration: You’ll need a tax identification number (EIN in the US, for example) to legally collect and remit sales taxes.
⚖️ Business Structure: Decide on your legal entity – be it a sole proprietorship, Limited Liability Company (LLC), or corporation. Each structure carries distinct legal and tax implications.
🏦 Business Bank Account: Crucially, separate your personal and business finances by opening a dedicated business bank account. This simplifies accounting, enhances professionalism, and can be critical for future audits.
🛡️ Business Insurance: Even small businesses face unforeseen challenges. Robust business insurance safeguards your online store against various risks and potential losses, providing peace of mind.
💳 Business Credit Card: A separate credit card helps meticulously track business expenses and is instrumental in building your business credit history.
With these legal and financial pillars in place, you’re now set for the detailed technical steps of building your online store with WordPress.
Step 4: Secure Your Digital Real Estate – Hosting & Domain Fundamentals
Before you can begin constructing your online store with WordPress.org, two non-negotiable assets are required: a domain name and web hosting.
Picture launching your online store as opening a physical shop. You need both a recognizable address where customers can find you and a physical building to house your inventory and operations.
Your Domain Name: This is your unique digital address – what customers type into their browser to reach your store. For instance, to visit us, you type "wpbeginner.com." Domain names typically cost around $15 annually, with extensions like .com, .shop, or .store available.
Web Hosting: This represents the actual "building" for your store. It’s the server space where all your product images, descriptions, content, and the entire website reside. Just as physical stores vary in size, websites require different hosting types (shared, managed WordPress hosting, VPS, etc.) based on their scale and needs.
Navigating the multitude of hosting options can be daunting. Having rigorously tested dozens of providers over the years, we consistently recommend Bluehost for new WordPress online stores. Here's why they stand out:
Free Domain Name: They include a free domain for your first year, saving you approximately $15.
WordPress.org Recommended: Bluehost has been a WordPress.org-recommended host since 2005—a testament to their reliability.
Affordable Pricing: Their plans are budget-friendly, making them ideal for emerging business owners.
Pre-installed WordPress + WooCommerce: Their Online Store plan comes with both WordPress and WooCommerce pre-installed, significantly streamlining your initial setup.
I’ve been recommending Bluehost since 2012, and their commitment to quality has only improved over the years.
I host several personal and business websites on Bluehost. Their ease of use and reliability make them a go-to choice for me.
Whether you’re just starting or looking to grow your online presence, Bluehost offers a solid hosting platform to build on.
For an in-depth analysis, explore our complete Bluehost review.
Exclusive ShareWordpress Deal: We've secured a special Bluehost coupon for our readers, granting you a free domain and a substantial discount on hosting. Click below to activate this offer:
Note: While we do earn a commission if you use our Bluehost link, rest assured it comes at no extra cost to you. In fact, our special arrangement means you’ll pay less. We only recommend services we personally use and implicitly trust.
Let’s proceed with securing your domain and hosting.
On the Bluehost page, click the prominent ‘Get Started Now’ button.
The next page will display various hosting plans. For an online store, we highly recommend the Online Store plan, as it includes everything you need, with WooCommerce pre-installed. Click ‘Select’ to choose it.
Now, the exciting part: choosing your domain name. You’ll have options to register a new domain or use an existing one. For a new domain, simply type your desired name. We strongly advise a .com domain if available, as it’s the most universally recognized. If not, explore our guide to alternative domain extensions. Click ‘Next’ to proceed.
Finally, enter your account information and finalize your package. You’ll see optional add-ons, which are generally not essential for starting and can be added later if needed.
Upon completing your purchase, check your email for Bluehost login details, which will grant you access to your hosting dashboard to manage your new website.
Step 5: Activate Your Platform – Effortless WordPress Installation
Here’s where choosing Bluehost, particularly through our Bluehost link, truly pays off: WordPress and WooCommerce come pre-installed with your hosting package. Bluehost engineered this automatic setup specifically to spare you from technical complexities.
Accessing your newly installed WordPress site is straightforward:
Simply sign in to your Bluehost account.
Navigate to the ‘Websites’ section in the left-hand menu.
Click ‘Edit Site.’ That’s it – you’re directly in your WordPress environment!
Alternatively, you can always access your WordPress dashboard by typing your domain name followed by /wp-admin/ in your browser (e.g., yourstore.com/wp-admin/). This is your direct WordPress login URL.
With WordPress at your fingertips, let’s move on to setting up your powerful WooCommerce store.
Step 6: Power Up Your Store – Configuring WooCommerce
If WooCommerce came pre-installed with your hosting (as it does with Bluehost’s Online Store plan), you’ll likely encounter the WooCommerce setup wizard immediately upon logging into your WordPress dashboard.
If not, don’t worry! Our comprehensive WooCommerce made simple tutorial will guide you through the quick installation process.
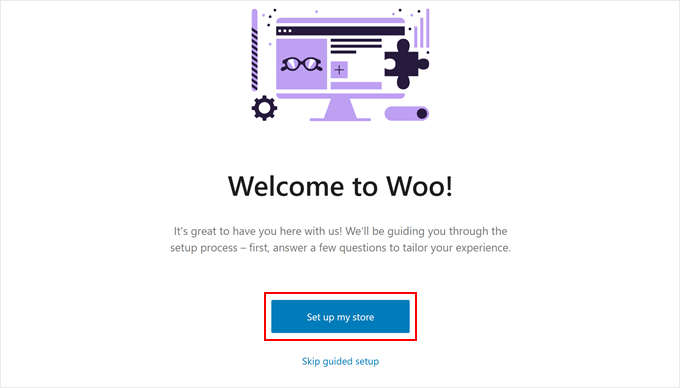
Once installed, initiate the setup wizard by clicking ‘Set up my store.’ While technically skippable, we highly recommend completing this wizard, as it automates the creation of essential WooCommerce store pages, saving you significant effort.
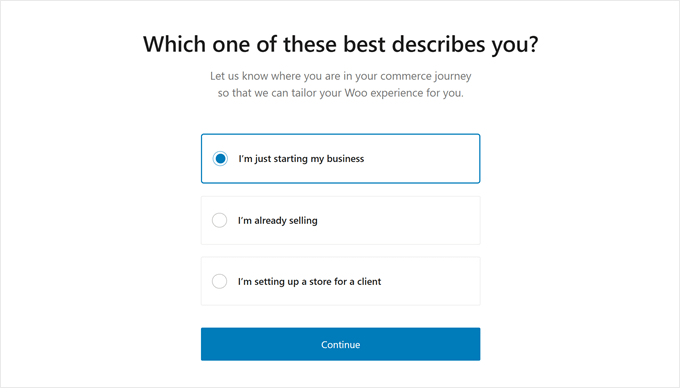
On the subsequent screen, WooCommerce will inquire about your e-commerce experience. If you’re just getting started, select the ‘I’m just starting my business’ option.
Next, provide crucial details about your business: your store’s name, product type, physical location, and your business email address. Once all fields are populated, click ‘Continue.’
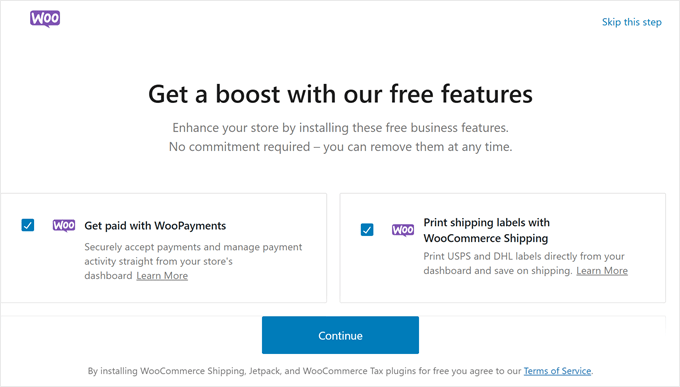
WooCommerce may then suggest some free WooCommerce extensions to install. Select any you plan to use and click ‘Continue,’ or simply click ‘Skip this step.’
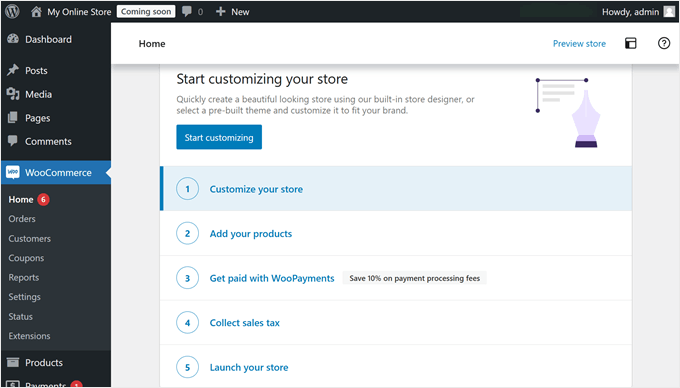
Allow a few moments for the installation process to complete. After setup, you’ll be directed to the WooCommerce plugin page, featuring a helpful checklist of next steps to fully build out your online store.
Step 7: Design Your Digital Storefront – Themes & Customization
As highlighted in the previous section, the very first item on your WooCommerce checklist is choosing the right WordPress theme. Think of your theme as the complete architectural package for your digital store; it governs everything from product display to the seamless customer journey.
While WordPress boasts a vast library of themes, not all are optimized for e-commerce. You need a theme specifically crafted for WooCommerce to ensure your products look stunning and your checkout process functions flawlessly. To simplify your choice, we’ve curated a list of the best WooCommerce themes.
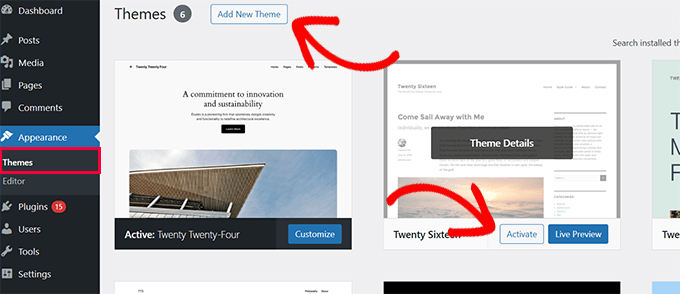
Installing a WordPress theme for your online store is straightforward: navigate to Appearance » Themes in your WordPress dashboard, click ‘Add New Theme,’ and browse or search for your chosen design.
When it comes to theme customization, WordPress offers two primary avenues: the traditional theme customizer or the modern full-site editor for block themes. Our ultimate guide on how to edit a WordPress website provides detailed instructions for both.
While both methods are effective, we personally advocate for using SeedProd’s theme builder. Why SeedProd? It’s like having a professional design agency at your fingertips. You gain a highly intuitive drag-and-drop page builder, access to over 350 pre-designed website templates, and an groundbreaking AI website builder that can generate your entire store design in moments.
Several of our partner brands have achieved phenomenal results building their complete websites with SeedProd. For a comprehensive overview, read our detailed SeedProd review.
Here’s a fantastic example of a SeedProd-powered theme for an online clothing store:
With e-commerce website builders like this, you can customize your online store to look and function exactly how you want. It’s also search engine optimization (SEO) friendly, so you can optimize your store for search engines, making it easier for potential customers to find your products.
Stacey Corrin, Lead Writer for SeedProd
SeedProd even features an AI website builder that crafts a bespoke theme for you in less than 60 seconds. Witness its speed in action:
Regardless of your chosen method, opt for the tool that aligns best with your comfort level. The most effective website design tool is one that minimizes frustration and empowers you to achieve your vision. Furthermore, perfection is not the immediate goal; theme customization is an iterative process, allowing continuous refinements as your store evolves.
Step 8: Populate Your Shelves – Adding and Optimizing Products
Now, let’s bring your store to life by adding your products. The fundamental process begins with navigating to Products » Add New from your WordPress menu. Here, you’ll input your product title and description.
Don't have your full product catalog ready yet? No problem! You can add sample data to visualize how your store will appear with products. Our guide on how to add WooCommerce sample data will show you how.
If your product information is already organized in a CSV spreadsheet, save valuable time by importing it all at once. Our tutorial on importing and exporting WooCommerce products eliminates the need for manual entry.
Once your products are loaded, focus on optimizing their presentation to entice customers:
Manage Stock Smarter:Prevent overselling and maintain accurate inventory with robust controls.
Beyond individual product listings, your WooCommerce product pages serve as your digital showroom. They must project professionalism and convert visitors into loyal customers. The extent of customization largely depends on your chosen theme, with some offering specialized product display features while others provide basic layouts.
This is where SeedProd truly shines, offering powerful tools to enhance your product pages. For instance, you can effortlessly add customer reviews with star ratings to build crucial social proof and influence purchasing decisions.
Further optimize your pages by displaying related products for upselling, showing recently viewed items to aid comparison, integrating social share buttons, and more.
Now, let’s configure the critical backbone of any online store: accepting payments, managing taxes, and streamlining shipping.
Secure Your Transactions: Payment Gateways
Go to WooCommerce » Settings and click the ‘Payments’ tab. You'll find standard options like Cash on Delivery, Checks, and Bank Transfers. WooCommerce also offers its proprietary payment gateway called WooPayments.
While initially convenient, WooPayments isn't always the optimal choice due to country restrictions and occasional reports of payment holds. We highly recommend exploring alternatives like Stripe with FunnelKit’s free gateway plugin, which offers advanced features like one-click payments via Apple Pay and Google Pay, alongside an intuitive setup.
Consider these other WooCommerce payment options to maximize customer convenience:
Integrate popular "[Buy Now, Pay Later](https://linkhay.org/s/-6f2e02plugins/how-to-add-buy-now-pay-later-payment-plans-to-wordpress/ "How to Add “Buy Now Pay Later” Payment Plans to WordPress)" options.
Next, let’s configure your tax settings. Navigate to WooCommerce » Settings and select the ‘Tax’ tab.
In ‘Tax options,’ define how taxes are displayed and calculated on your store. You can choose whether to include tax in your product prices, how taxes are presented in the shop and cart, and the basis for tax calculations.
Under ‘Standard rates,’ meticulously set up your tax rules. Input details such as the countries and regions you sell to, the corresponding tax rates for each area, and clear names for different taxes (e.g., GST or VAT). If you have numerous tax rates, save time by importing them via a CSV file. Always click ‘Save changes’ once done.
Deliver with Ease: Configuring Shipping
Finally, let’s set up your shipping options, found under the ‘Shipping’ tab in WooCommerce settings.
Utilize ‘Shipping zones’ to delineate your shipping regions and assign different methods for each, such as free shipping or flat rates.
Within ‘Shipping options,’ configure settings like whether to display the shipping calculator on the cart page, define the default shipping address, and enable debug mode for troubleshooting. Remember, transparent shipping costs displayed early in the process build trust and significantly reduce cart abandonment.
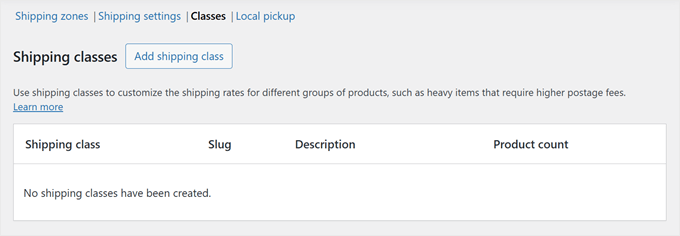
The ‘Classes’ tab allows you to create specific shipping rates for various product types, enabling you to set higher rates for heavier or fragile items requiring special handling.
Enhance customer satisfaction by adding a shipment tracking feature to your store. If you offer local pickup, activate this option in the ‘Local pickup’ tab. While it’s free by default, you can introduce pricing based on your operational needs.
Your online store is now primed to accept orders. Before your grand launch, let’s fine-tune it for maximized success.
Step 10: Supercharge Your Store – Essential Optimization & Growth Tools
Before unveiling your online store, a strategic layer of optimization is crucial. While not strictly mandatory for launch, these enhancements will dramatically elevate your store's performance, customer experience, and long-term success.
Start by integrating these three indispensible WordPress plugins, foundational for any thriving WordPress online store:
Connects your store with Google Analytics for invaluable insights into customer behavior and sales data directly within WordPress.Free version available | Paid plans from $99.60/yr
Read Our Review
Empowers you to optimize your online store for search engines, simplifying complex SEO tasks with intelligent, automated features.Free version available | Paid plans from $49.60/yr
Read Our Review
Crafts highly optimized checkout experiences and sales funnels, significantly reducing cart abandonment with smart, seamless flows.Free version available | Paid plans from $99.50/yr
Read Our Review
Beyond these critical essentials, consider implementing these additional optimizations to truly maximize your store’s potential:
📞 Contact Forms: Every professional store needs an accessible contact point. WPForms is our top recommendation for creating trust-building, seamless forms.
🔍 Advanced Product Search: Make it incredibly easy for customers to find desired products. SearchWP elevates your WooCommerce search capabilities.
⭐ Social Proof: Leverage customer trust. TrustPulse displays live sale notifications, and Smash Balloon Reviews Feed elegantly showcases reviews from platforms like Google and Trustpilot.
📱 Customer Engagement: Keep customers returning. PushEngage delivers effective browser notifications, and Constant Contact powers your email marketing.
💾 Robust Backups: Safeguard your store’s data. Duplicator provides reliable, comprehensive backups of your entire site.
🔒 Enhanced Security: Protect your store and customer data from threats. Cloudflare offers additional security layers and performance boosts.
🌎 Global Reach (Translation): Expand your customer base by making your store multilingual. Weglot automatically translates your entire WooCommerce website.
Step 11: Continuous Growth – Mastering WordPress Beyond the Launch
WordPress is an incredibly powerful and adaptable platform, yet its depth can sometimes seem overwhelming for beginners. Recognizing this, we’ve diligently crafted a wealth of free resources designed to ensure your ongoing success.
At ShareWordpress, our mission is to demystify WordPress, making it accessible even if you're not tech-savvy. Here’s how you can continually learn and grow with us:
Comprehensive Learning Resources
ShareWordpress Blog: Dive into detailed WordPress tutorials covering every conceivable topic.
ShareWordpress Videos: Benefit from step-by-step visual guides that simplify complex processes.
ShareWordpress Deals: Unlock exclusive WordPress discounts on premium plugins, themes, and services.
ShareWordpress Solution Center: Find the absolute best WordPress plugins, themes, and essential tools, vetted by our experts.
ShareWordpress Blueprint: See the exact tools and plugins we rely on to run our own successful operations.
To truly maximize the value of these offerings, consult our guide on how to make the most out of ShareWordpress’s free resources. Many of our users have discovered a simple hack: type your question into Google, followed by ‘wpbeginner’ (e.g., ‘how to add product search in woocommerce wpbeginner’) to instantly find relevant, authoritative articles from our site.
Step 12: Expand Your Horizon – Scaling & Diversifying Your E-commerce Business
Congratulations! You’ve mastered the fundamentals of building a robust online store with WordPress. But here's the exciting part: your WordPress-powered store is not limited to a single product type. Its flexibility means you can sell virtually anything imaginable!
Consider the vast array of products and services we’ve helped our users successfully market:
The most compelling aspect is that WooCommerce, with its vast ecosystem of plugins and intuitive customization options, makes selling any of these product types incredibly achievable – no coding skills required.
Ready to explore limitless possibilities? Our comprehensive WordPress e-commerce setup guide covers diverse product types and advanced configurations.
Your Burning Questions Answered – Online Store FAQs
Many aspiring entrepreneurs often reach out to us with similar questions about launching their businesses online. We've compiled answers to the most frequently asked questions below:
Where do I find products to sell in my store?
Product sourcing is diverse. Many sellers offer digital goods like software, art, or music. Others source from local or international vendors via marketplaces such as Alibaba or AliExpress. If you prefer to avoid inventory and shipping, consider starting a print-on-demand shop or exploring dropshipping.
Can I start an online store for free?
Some e-commerce platforms offer limited free trials, allowing you to begin without immediate cost. However, ongoing operations typically require payment after the trial period. While the WooCommerce plugin itself is free, you will need to invest in a domain name and web hosting, which incur costs.
How much does it cost to start an online store?
The cost of launching an online store varies greatly depending on your business plan and budget. By utilizing our special Bluehost link, you can get started for as little as $1.99 per month, and leverage free plugins and themes to minimize initial expenses. We always recommend starting with a lean business model and incrementally investing as your business scales.
Can I create an online store without shipping products?
Absolutely. You can build an online store using dropshipping plugins, create an Amazon affiliate store, or even develop an eBay-like marketplace. It’s also possible to sell both your own products and external items from the same store.
Prefer Visual Learning? Watch Our Step-by-Step Video Tutorial
If you're a visual learner, our comprehensive video tutorial walks you through every step of building your online store:
You've now navigated the comprehensive guide to launching your very own online store with WordPress and WooCommerce. From defining your product and crafting a compelling brand to securing your digital real estate and configuring the crucial elements of payments and shipping, you possess the knowledge to build a robust e-commerce presence.
The journey to online entrepreneurship is exciting, and with the power of WordPress, you’re not just building a website – you’re building a scalable, flexible business with unlimited potential.
Ready to take the leap and transform your entrepreneurial dreams into a thriving online reality?
Start Building Your Dream Online Store Today with ShareWordpress's Guidance, or let our Experts Handle Everything for You!
If this article has empowered you, consider subscribing to our YouTube Channel for invaluable WordPress video tutorials. You can also connect with our community on Twitter and Facebook.