

Changing your WordPress theme promises a fresh, modern look and enhanced functionality, but the thought alone can strike fear into the hearts of website owners. Visions of broken layouts, lost content, plummeting SEO, or unexpected downtime are common anxieties. What if a simple design refresh leads to a costly site rebuild?
We understand these concerns. Our team has helped hundreds of businesses navigate the complexities of WordPress, specializing in smooth, impactful theme transitions. A rushed or ill-prepared theme change can indeed lead to navigation issues, missing widgets, or a frustrating user experience. But executed correctly, it's a powerful strategy that can significantly boost your site's aesthetics, performance, and user engagement.
This definitive guide will demystify the process, transforming potential pitfalls into a clear, actionable roadmap. We'll walk you through a meticulous step-by-step checklist, ensuring your theme switch is not just safe, but also strategically advantageous, preserving your hard-earned traffic and functionality.
Beyond simply a new coat of paint, strategically updating your WordPress theme offers a multitude of benefits that can propel your website forward.
Perhaps your current theme no longer aligns with your brand's evolving identity or niche. For instance, a growing fashion blog might demand a theme that exudes professional sophistication, mirroring industry standards and captivating a more discerning audience.
A theme switch is also an opportunity to:
Now, let's dive into the practical steps to execute this transformation flawlessly. Here’s a quick overview of what awaits you in this guide:
While WordPress seemingly makes theme changes a breeze, overlooking crucial preparatory steps can turn a simple switch into a significant headache. Before you activate that new theme, ensure you've ticked off every item on this essential checklist to safeguard your data and maintain site integrity.
Many developers and savvy WordPress users embed custom code directly into their theme's core files, most commonly the functions.php file. These crucial modifications, often made long ago, are easily forgotten. Scour your current theme's files now to identify and copy any custom CSS, JavaScript, or PHP snippets. Migrating these to your new theme or a site-specific plugin will prevent critical functionality loss.
Expert Tip: For future-proofing your site, always add custom code using WPCode, the industry-leading WordPress code snippets plugin. This ensures your modifications persist across theme changes and updates, saving you significant hassle. Learn more with our guide on how to properly add custom code in WordPress.
Before making any changes, measure your website's initial load time. This baseline is critical for evaluating the performance impact of your new theme. Remember, WordPress speed directly affects user experience and search engine rankings. A faster theme generally translates to better engagement and SEO.
Utilize a reliable WordPress speed test tool to gather accurate data. Test both your homepage and a few key inner pages for a comprehensive overview. For detailed instructions, refer to our guide on how to run a site speed test.
A common oversight is losing vital analytics and advertising tracking codes. If you've manually inserted Google Analytics, AdSense, or other tracking scripts directly into theme files or via theme options, they'll vanish with the old theme.
Proactively copy all such snippets. To truly future-proof your analytics, we highly recommend integrating Google Analytics via a dedicated plugin like MonsterInsights. This powerful plugin allows you to manage analytics directly from your WordPress dashboard, removing reliance on theme files. We rely on MonsterInsights daily at ShareWordpress for invaluable insights into conversions, referrals, and content performance. Discover why in our comprehensive MonsterInsights review.

For other ad or tracking codes, WPCode remains the optimal solution. Check out our detailed tutorial on how to properly add Google AdSense to WordPress.
This is non-negotiable. Before initiating any major site changes, create a complete backup of your entire WordPress instance – including your database, files, themes, and plugins. This serves as your fail-safe, allowing for instant recovery if anything goes awry during the theme transition.
A robust WordPress backup plugin like Duplicator makes this process effortless. Ensure you download the backup files to your local machine. Our partner brands consistently report excellent results with Duplicator, as detailed in our Duplicator review.

For more guidance, consult our beginner’s guide on how to back up your WordPress site.
Sidebars often house crucial elements like social links, advertisements, subscription forms, or contact forms. While some widget content migrates smoothly, custom code or specific configurations embedded within widgets might be lost. Take screenshots or copy any custom code from your sidebar widgets to ensure a seamless reinstatement with your new theme.
To prevent visitors from encountering a half-finished or broken site during your theme change, put your website in maintenance mode. This professional approach ensures a smooth user experience.
We highly recommend SeedProd, the best WordPress page builder available, for creating stunning "coming soon" or maintenance mode pages.

Here's how to quickly enable it:


Need inspiration? Explore our list of maintenance page ideas that you can use on your WordPress site.
With your site prepped and protected, the next logical step is to install your chosen theme. WordPress offers flexible options for adding new themes, catering to various user preferences and technical savviness.
You can install a WordPress theme via:
For detailed, step-by-step instructions on each method, please refer to our comprehensive beginner’s guide on how to install a WordPress theme.
If you've yet to select your ideal theme from the thousands available, here are our top recommendations, celebrated for their versatility, performance, and user-friendliness:

Sydney is a robust, highly extensible multipurpose theme engineered for professional websites. Its standout feature is a library of over 28 beautifully designed starter sites, importable with a single click, allowing you to bypass starting from a blank canvas. With extensive WordPress Customizer integration, you can visualize changes in real-time. Sydney also provides diverse pre-built sections for headers, footers, and blog layouts, and it integrates flawlessly with popular page builders like Elementor for advanced customization. Crucially, Sydney is built with speed in mind, contributing positively to your site's overall performance.

Divi stands as one of the most acclaimed WordPress themes, powered by its revolutionary drag-and-drop Divi Builder. This intuitive visual builder empowers you to construct virtually any website layout with unparalleled ease. Boasting over 2000 pre-built layouts and 200 content elements, Divi offers endless customization possibilities, all with real-time visual feedback. Additionally, Divi is engineered for SEO excellence, helping your content rank higher across major search engines.
While previously mentioned for maintenance mode, SeedProd truly shines as the best WordPress theme builder on the market, trusted by over a million users. It enables you to create a custom WordPress theme from scratch, code-free. Our real-time testing confirmed its exceptional beginner-friendliness, and our partners have successfully leveraged it to develop visually stunning themes their users adore. Read our full SeedProd review for more insights. The plugin comes equipped with a drag-and-drop builder and over 300 professionally designed templates, plus dynamic blocks and WordPress template tags, all rendered in a real-time preview, showing exactly how your site will look before publication.

Astra stands out as an incredibly lightweight and performance-optimized WordPress theme, meticulously coded for speed. It seamlessly integrates with leading page builders like SeedProd, Beaver Builder, Divi, and Visual Composer. Astra is fully translation and RTL-ready, enabling you to build multilingual sites with ease. Its deep integration with WooCommerce empowers you to easily create an online store and customize every aspect via the WordPress Theme Customizer. What we particularly love about Astra is its vast library of over 250 starter website templates, covering every imaginable niche from business to eCommerce to personal blogs.

OceanWP is a highly responsive and multi-purpose WordPress theme known for its flexibility. It offers a diverse selection of demo templates, thoughtfully crafted for various professions and industries. Compatible with all major page builder plugins, OceanWP also provides a rich ecosystem of extensions to expand your site's capabilities.
Installing a new theme is only half the battle. Before you expose your live audience to a potentially disruptive change, it's paramount to rigorously test your new theme. This allows you to verify compatibility with existing plugins, custom code, and content, ensuring a flawless transition.
WordPress provides several powerful methods to test your theme without affecting your live website:
WordPress offers a convenient, immediate way to preview a theme without activating it. This is ideal for a quick glance or initial assessment.

For a more robust preview environment than the standard Live Preview, the Theme Switcha plugin allows administrators to view a new theme while regular visitors still see the active live theme.


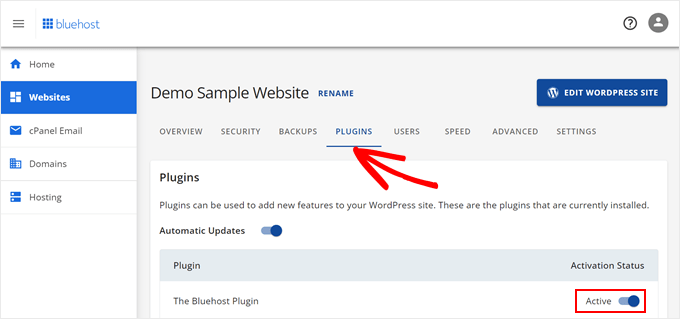
For mission-critical websites or complex theme changes, testing on a staging site is the gold standard. A staging site is an identical clone of your live website, providing a safe, isolated environment to test changes without any risk to your production site. Many hosting providers now offer built-in staging capabilities, simplifying this process. We'll demonstrate using Bluehost.
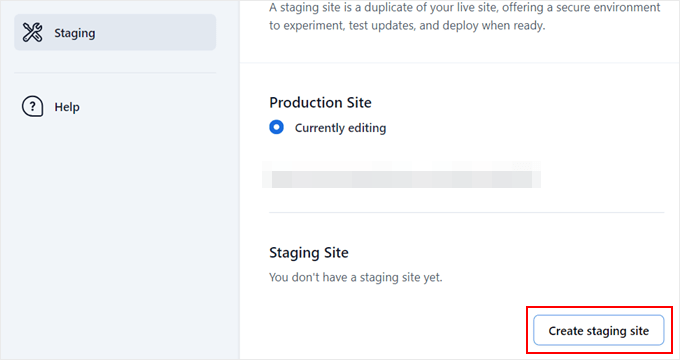


For more details, consult our beginner’s guide on how to easily create a staging environment for a WordPress site.
After thorough testing and confirmation that your chosen theme functions perfectly, it's time for the main event: activating it on your live WordPress site.

Congratulations! Your new theme is now live. Visit your website's homepage to admire your site's fresh look.
In rare circumstances, you might find yourself locked out of your WordPress admin area. This often prevents you from changing themes through the standard dashboard method. While restoring from a backup is usually the first line of defense, a manual theme change via phpMyAdmin offers a direct solution by reconfiguring your site's database.
Important: This method requires careful execution. Proceed only if you're comfortable with database management or if your site is otherwise inaccessible. A mistake here can severely damage your website.
Identify Your Theme's Folder Name:
/wp-content/themes/ folder.
Access phpMyAdmin:
Navigate to Your WordPress Database:
wp_options table.wp_ (e.g., wp_xyz_options), particularly if you've implemented custom security measures, like changing the WordPress database prefix to improve security.
Edit template and stylesheet Rows:
wp_options table, locate the template and stylesheet rows.template row, click the 'Edit' link.
option_value field, replace the existing theme name with the exact folder name of your new theme (the one you noted down earlier).
stylesheet row.
After successfully modifying both rows, refresh your website. Your new theme should now be active.
Activating your new theme is a significant milestone, but your work isn't quite done. Before disabling maintenance mode and announcing your site's fresh look to the world, a critical post-launch checklist ensures everything is running optimally and delivers the best possible experience for your visitors.
Start by rigorously testing every aspect of your site. Click through all pages, posts, and navigation menus. Verify that:
Allocate ample time for this step to catch any hidden issues.
Different web browsers interpret code in unique ways. What looks perfect in Chrome might have minor display issues in Firefox, Safari, or Brave. It's crucial to test your site in different web browsers to ensure a consistent experience for all users.
Remember those tracking codes you painstakingly copied? Now's the time to re-integrate them.
Once you've confirmed all checks are complete and your site is pristine, it's time to welcome visitors back.

Your site is now live with its brand-new theme!
With the new theme active, conduct another speed test using the IsItWP Website SpeedTest Tool. Compare this benchmark against your initial pre-switch measurement. If you observe any performance degradation, promptly refer to our comprehensive guide on how to improve WordPress speed.
After a theme change, closely monitor your site's bounce rate. A sudden increase could signal a less intuitive design or navigation issues with your new theme. Consider implementing features like related posts, popular posts widgets, or breadcrumbs to reduce bounce rate and encourage more page views.
Engage your audience! Their fresh perspective is invaluable. Consider adding a short survey form or running online polls to gather suggestions on your new design. For instance, you might deploy a simple two-question survey. See our tutorial on how to create a survey in WordPress for detailed instructions. Sharing the new design with your email subscribers via your preferred email marketing service and inviting their feedback can also provide unique insights and foster community engagement.
You've painstakingly selected and customized your new WordPress theme to perfection. Now, how do you ensure those precious adjustments aren't wiped out with the next theme update? Standard theme updates can overwrite modifications made directly to the theme's functions.php file, stylesheet, or templates. Fortunately, two primary strategies safeguard your customizations:
The most widely recommended best practice for theme customization is creating a child theme. A child theme inherits all the functionality, features, and styling from its "parent" theme. Any modifications you make are applied within the child theme, leaving the parent theme's core files untouched. This allows you to update the parent theme safely without losing your custom work.
Here’s the basic workflow:

For a comprehensive guide, see our tutorial on how to update a WordPress theme without losing customization.
For individual code snippets (PHP, CSS, JavaScript), the most robust and user-friendly approach is to use WPCode. As the leading code snippet plugin for WordPress, WPCode allows you to add custom code safely and efficiently, storing it independently of your theme.

With WPCode, you’ll never again worry about losing your functions.php, stylesheet, or external script modifications when performing theme updates. Your code lives within the plugin, automatically executing across any theme change or update. Read our complete WPCode review to learn why it's an indispensable tool for any WordPress site owner.
We trust this in-depth guide has equipped you with the knowledge and confidence to safely and effectively change your WordPress theme. Embrace the power of a fresh design and enhanced functionality! For further optimization, delve into our beginner’s guide on how to use the WordPress theme customizer and explore our top picks for key design elements for an effective WordPress website.
If this article helped you, consider subscribing to our YouTube Channel for more WordPress video tutorials. You can also connect with our community on Twitter and Facebook for the latest WordPress insights and tips.

